Word Processing
Introduction
Word processing is the generation, editing, and formatting of written texts using specialised software. It lets users to enter, modify, and change text, add pictures, and apply numerous formatting styles. Word processing software, such as Microsoft Word or Google Docs, is extensively used for personal and professional document creation.
Word Processing Basics
The fundamentals of word processing include producing, editing, and formatting text documents. Users may type, alter information, use fonts, styles, and alignments, and include photos or tables for a variety of reasons such as personal or professional communication.

Creating a New Document
Create a new document, follw the steps below :
- Go to the Menu bar.
- Go to the File tab, a dialog box will appear.
- Click on New and then click on text Document.
- A new blank document will appear.
- Now type some text in the document and save it from file menu by using Save option.

Opening and Closing Document
In LibreOffice Writer, to create a document, we have to open it, we can open ether an old document or a completely new document.
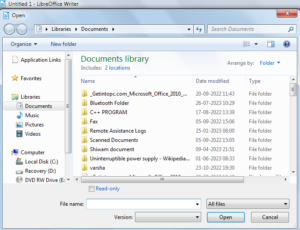
Opening Document
To open a document follow the given steps :
- Click on File – Open the Menu bar. OR
- Click on File – Open Remote File on the Menu bar. OR
- Click on the drop-down list of open icon on the standard toolbar.
- Shortcut Key – Ctrl + O
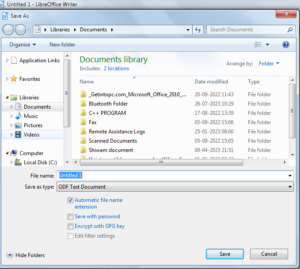
Save and Save as
Steps to save a document :
- Click on File Menu – Save / Click on File Menu – Save As.
- Save As dialog box will appear on your screen, enter the file name and choose the location then click on Save Button
- Open a Save As dialog box where you can change the file name, type or location and click on Save.
- Shortcut Key – Ctrl + S / Ctrl + Sift + S
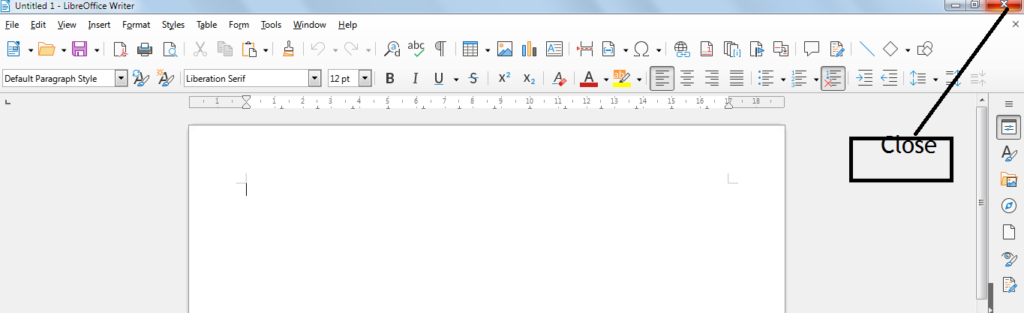
Closing Document
To close the document follow the given steps :
- Go to File Menu.
- Click on close.
- You can also click on top right cross button to close the file.
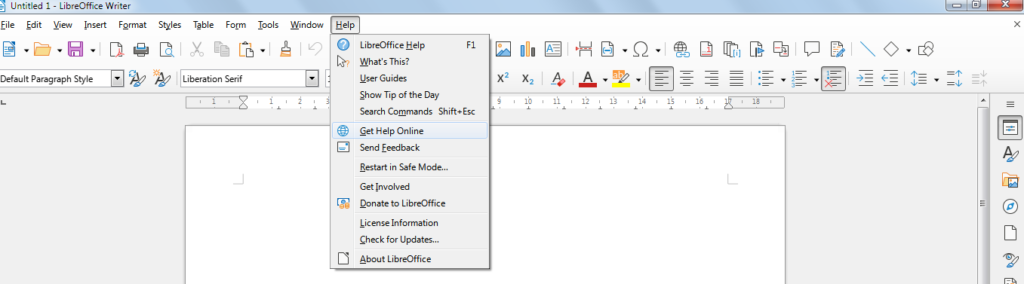
Using the Help
The LibreOffice writer help page is displayed in your systen’s default web browser. The open the Help page, click on get Heip Online of the Help Tab.

Page Setup
In LibreOffice writer you can set your page margins Page style etc. like MS WORLS
iM LIBREoFFICE WRITER WINDOgO TO FORMAT mENU.
Print of Document
In LibreOffice writer you can set your page margins Page style etc. like MS WORLD
I’m LibreOffice writer Window to format menu.
PDF File and Saving a Document as PDF File
Use the following steps to save a document as a PDF file
- File menu – Export as – Export as PDF, a dialog box will appear on screen.
- Select export bookmark in dialog box.
- Click on Export.
- Enter a document name in file name and click on save.
Text creation and Manipulation
The processes of producing and altering textual content are collectively referred to as text creation and manipulation. This entails writing original material, copying, cutting, and pasting chunks of text, erasing or rearrangement of words, sentences, or paragraphs, as well as formatting, styles, and other changes to improve the overall structure and presentation of the text.
Document Creation
To create a new document follow the steps given below :
- In the file menu select new.
- From the new dialog box select blank document and then create to create a new blank document. User can also select a Templates to create a new document.
- Shortcut key – Ctrl + N.
Cut, Copy and Paste
To cut, copy and paste follow the following steps :
- You have to select the text which you want to cut and then click on the cut toolbar or Ctrl + X.
- Place the cursor where you want to place the text and click on the paste toolbar or Ctrl + V.
- Select the text you want to copy and click n copy toolbar or Ctrl + C.
- Place the cursor where you want to paste the copy text and then click on paste toolbar or Ctrl + V.
Font Selection
To change the font type follow these steps :
- Select the text.
- Go to the Home tab and click on the drop down arrow of the font list box in the font group.
- Select the font type from the drop down list.
Color Selection
To change the color of text follow these steps :
- Select the text.
- Go to the Home tab and click on the drop down arrow of the font color box in the font group.
- Select the font color from the drop down list.
Font Style
To change the Font of text follow these steps :
- Select the text.
- Go to the Home tab and click B – Bold in the font group.
- Go to the Home tab and click I – Italic in the font group.
- Go to the Home tab and click U – Underline in the font group.
Font Size
To change the Font of text follow these steps :
- Select the text.
- Go to the Home tab and click the drop down arrow of the font size box in the font group.
- Choose the font size from the drop down list.
Alignment of Text
Do the steps given below for alignment of text :
- Select the text and go to the format menu – Paragraph – Alignment.
- A paragraph dialog box will appear on screen click on the option as Left Right , Center or Justified.
- You can click formatting toolbar option as left right center or justified.
Autocurrect spelling and Grammar
To check spelling and grammar in your file press F7 or do the following steps :
- Click the Review tab on the ribbon then click spelling or spelling & grammar.
- If the program find spelling mistack a dialog box will appear with the first appear misspelled world found by the spelling checker.
- After you decide how to resolve the misspelling the program moves to the next misspelled world.
Formatting of Text
Text formatting involves changing the way that written material looks and is presented. To improve readability and aesthetic appeal in papers, presentations, and digital material, typographic elements can be used to change font type, size, and colour, add bold, italics, or underline, align text, make lists, insert headings, and more.
Paragraph Indentation
Here are the steps to set the indent and spacing :
- Go to format menu – Paragraph – Indent and Spacing.
- You can specify the amount of space to leave between the left and right page margin and paragraph.
- You can set the amount of space before and after text.
- You can set line spacing as single, 1.15 lines, 1.5 lines, double etc.
Bullets and Numbering
Here are the steps to set the Bullets and Numbering:
- Select the text and paragraph you want to bullet & number.
- Go to format menu – Bullets and Numbering.
- You will see a Bullets and Numbering dialog box. Choose a specific style and click on OK.
Changing Case
To change the case of selected text in a document, do the following steps :
- Select the text for which you want to change the case.
- Format menu – Text – Change case.
Adding Header
To add a header following the steps :
- Go to the Insert menu and select header option from the header and footer group. A gallery of some built – in formats will appear.
- Choose any built – in format for your header. After choosing a format, the header area will be shown in the document.
- Type the text you want the header area and click the Close header and footer.
Adding Footer
To add a Footer following the steps :
- Go to the Insert menu and select footer option from the header and footer group. A gallery of some built – in formats will appear.
- Choose any built – in format for your footer. After choosing a format, the header area will be shown in the document.
- Type the text you want the footer area and click the Close header and footer button.
Table Manipulation
Table manipulation, which is frequently encountered in spreadsheet applications or databases, is the process of changing and managing data within a table. Users may efficiently and effectively organise, analyse, and present information using operations including adding, deleting, sorting, filtering, and changing table data.
Insert and Draw Table
You can also insert a table into document by using following steps :
- Select table tab – insert table. OR
- Click to insert table icon from the standard toolbar. Select maore option button.
- Enter table name and number of columns and rows.
- Select style from the style option.
- Click on Insert.
Changing cell Width and Height
You can change or fix the height and width of the row in Table in LibreOffice Writer by doing method given below :
- Place your cursor in that cell you want to change the width and height.
- Go to the table menu – size – Row / Column height.
- A row height dialog box will appear you can change row / column height by using (-) and (+) or click on heck box option and click on OK.
Alignment of Text in Cell
If the user wants to change the alignment of the text in the cell, then user should use the following steps :
- Click on the Cell to which the alignment of the text is to be changed.
- Go to Format Menu – Align. click on the desired alignment.
Delete Column, Row and Cell
You can delete column, row and cell by using the steps given below :
- Place your cursor or select column, row and cell you want to delete.
- Go to Right click – Delete – Rows / Columns / Table
Merge of Row, Column and Cell
It is a way of combining two separate cells into a single cell. To merge two or more cells, follow these steps :
- Select the row, column or cell you want to merge.
- Go to Right click – Merge cells. OR
- Go to Table Menu – Merge Cells.
Row, Column and Cell Splitting
It is a way of breaking a single cell into two or more cells. To split a cell, follow these steps :
- Select the row, column or cell you want to split.
- Go to Table menu – split cells – A dialog box will appear.
- You can increase or decrease cell number by using (+) or (-) and click on OK.
Border and Shading
You have to follow the steps given below for border and shading :
- Go to format menu – Page – Border
- A dialog box will appear on screen.
- Set line arrangement, line style, width color, padding, Distance.
- Click on Apply and Ok.
Define Border and Object
Follow the given steps to define Border for object :
- Select the object and go o format menu page – Border, A dialog box will appear.
- Set line arrangement, line style, width color, padding and distance
- Click on Apply and Ok.
Define Border and Object
Follow the given steps :
- Select the Table cells.
- Go to table – properties – border, A dialog box will appear.
- Set line arrangement, line style, width color, padding and distance
- Click on Apply and Ok.
Mail Merge
A word processing tool called mail merge enables the mass production of personalised documents like letters and emails. It creates customised output for each recipient by combining variable fields from a data source, such as a spreadsheet, into a template. When communicating with many receivers at once, this streamlines the process and saves time.
I. Mail Merge Overview Definition and goal B. Implementation: template and data source
II. Configuring Mail Merge
A. choosing the type of document (such as a letter, email, or label); B. designing the template with variable fields.
C. Getting ready the data source, such as an Excel spreadsheet
III. Adding Data to the Template in Third Place
A. establishing a connection between the data source and template B. examining and updating the merged material C. concluding the merge process
IV. Mail Merge’s Advantages and Uses
A. Scalable personalised communication B. Simplifying repetitious chores
C. Increasing efficiency and productivity
V. Summary
A. Benefits of mail merge summarised
B. A recommendation to use mail merge to facilitate effective communication.
Shortcut Keys
Many programmes have their own set of specialised shortcuts for carrying out particular tasks. Learning them can help you use those applications more quickly. To learn about the shortcuts offered by the application, consult the help or documentation. Shortcut Keys
